
In the modern landscape of digital entertainment, from the sprawling open worlds of AAA video games to the hyper-realistic visual effects of cinematic blockovers, the illusion of life is built upon a hidden, complex foundation. While audiences marvel at the fluidity of a character’s stride or the subtle shrug of a hero’s shoulder, these movements are the result of meticulous technical artistry. At the heart of this process lies the 3D rig—a digital skeleton that defines how a model moves, deforms, and interacts with its environment. However, a rig is only as effective as its internal logic, and perhaps no element of rigging is as critical, or as frequently misunderstood, as joint orientation.
Technical artists and animators often face a recurring challenge: a character that looks perfect in a static pose but breaks apart the moment it begins to move. Often, the culprit is not the mesh or the skin weights, but the orientation of the underlying joints. In a professional production pipeline, the way a joint’s axes are aligned can mean the difference between a seamless animation process and a technical nightmare fraught with unpredictable rotations and "gimbal lock." Understanding how to manage these axes is a fundamental skill for any 3D artist aiming to produce industry-standard work.
The Logic of the Digital Skeleton
When a digital artist creates a joint chain in software like Autodesk Maya or SideFX Houdini, the software typically applies a default orientation. In most standard workflows, a joint is automatically configured to "aim" at its child in the hierarchy. This creates a predictable path for the primary axis—frequently the X-axis—which runs directly down the length of the virtual bone toward the next joint in the chain.
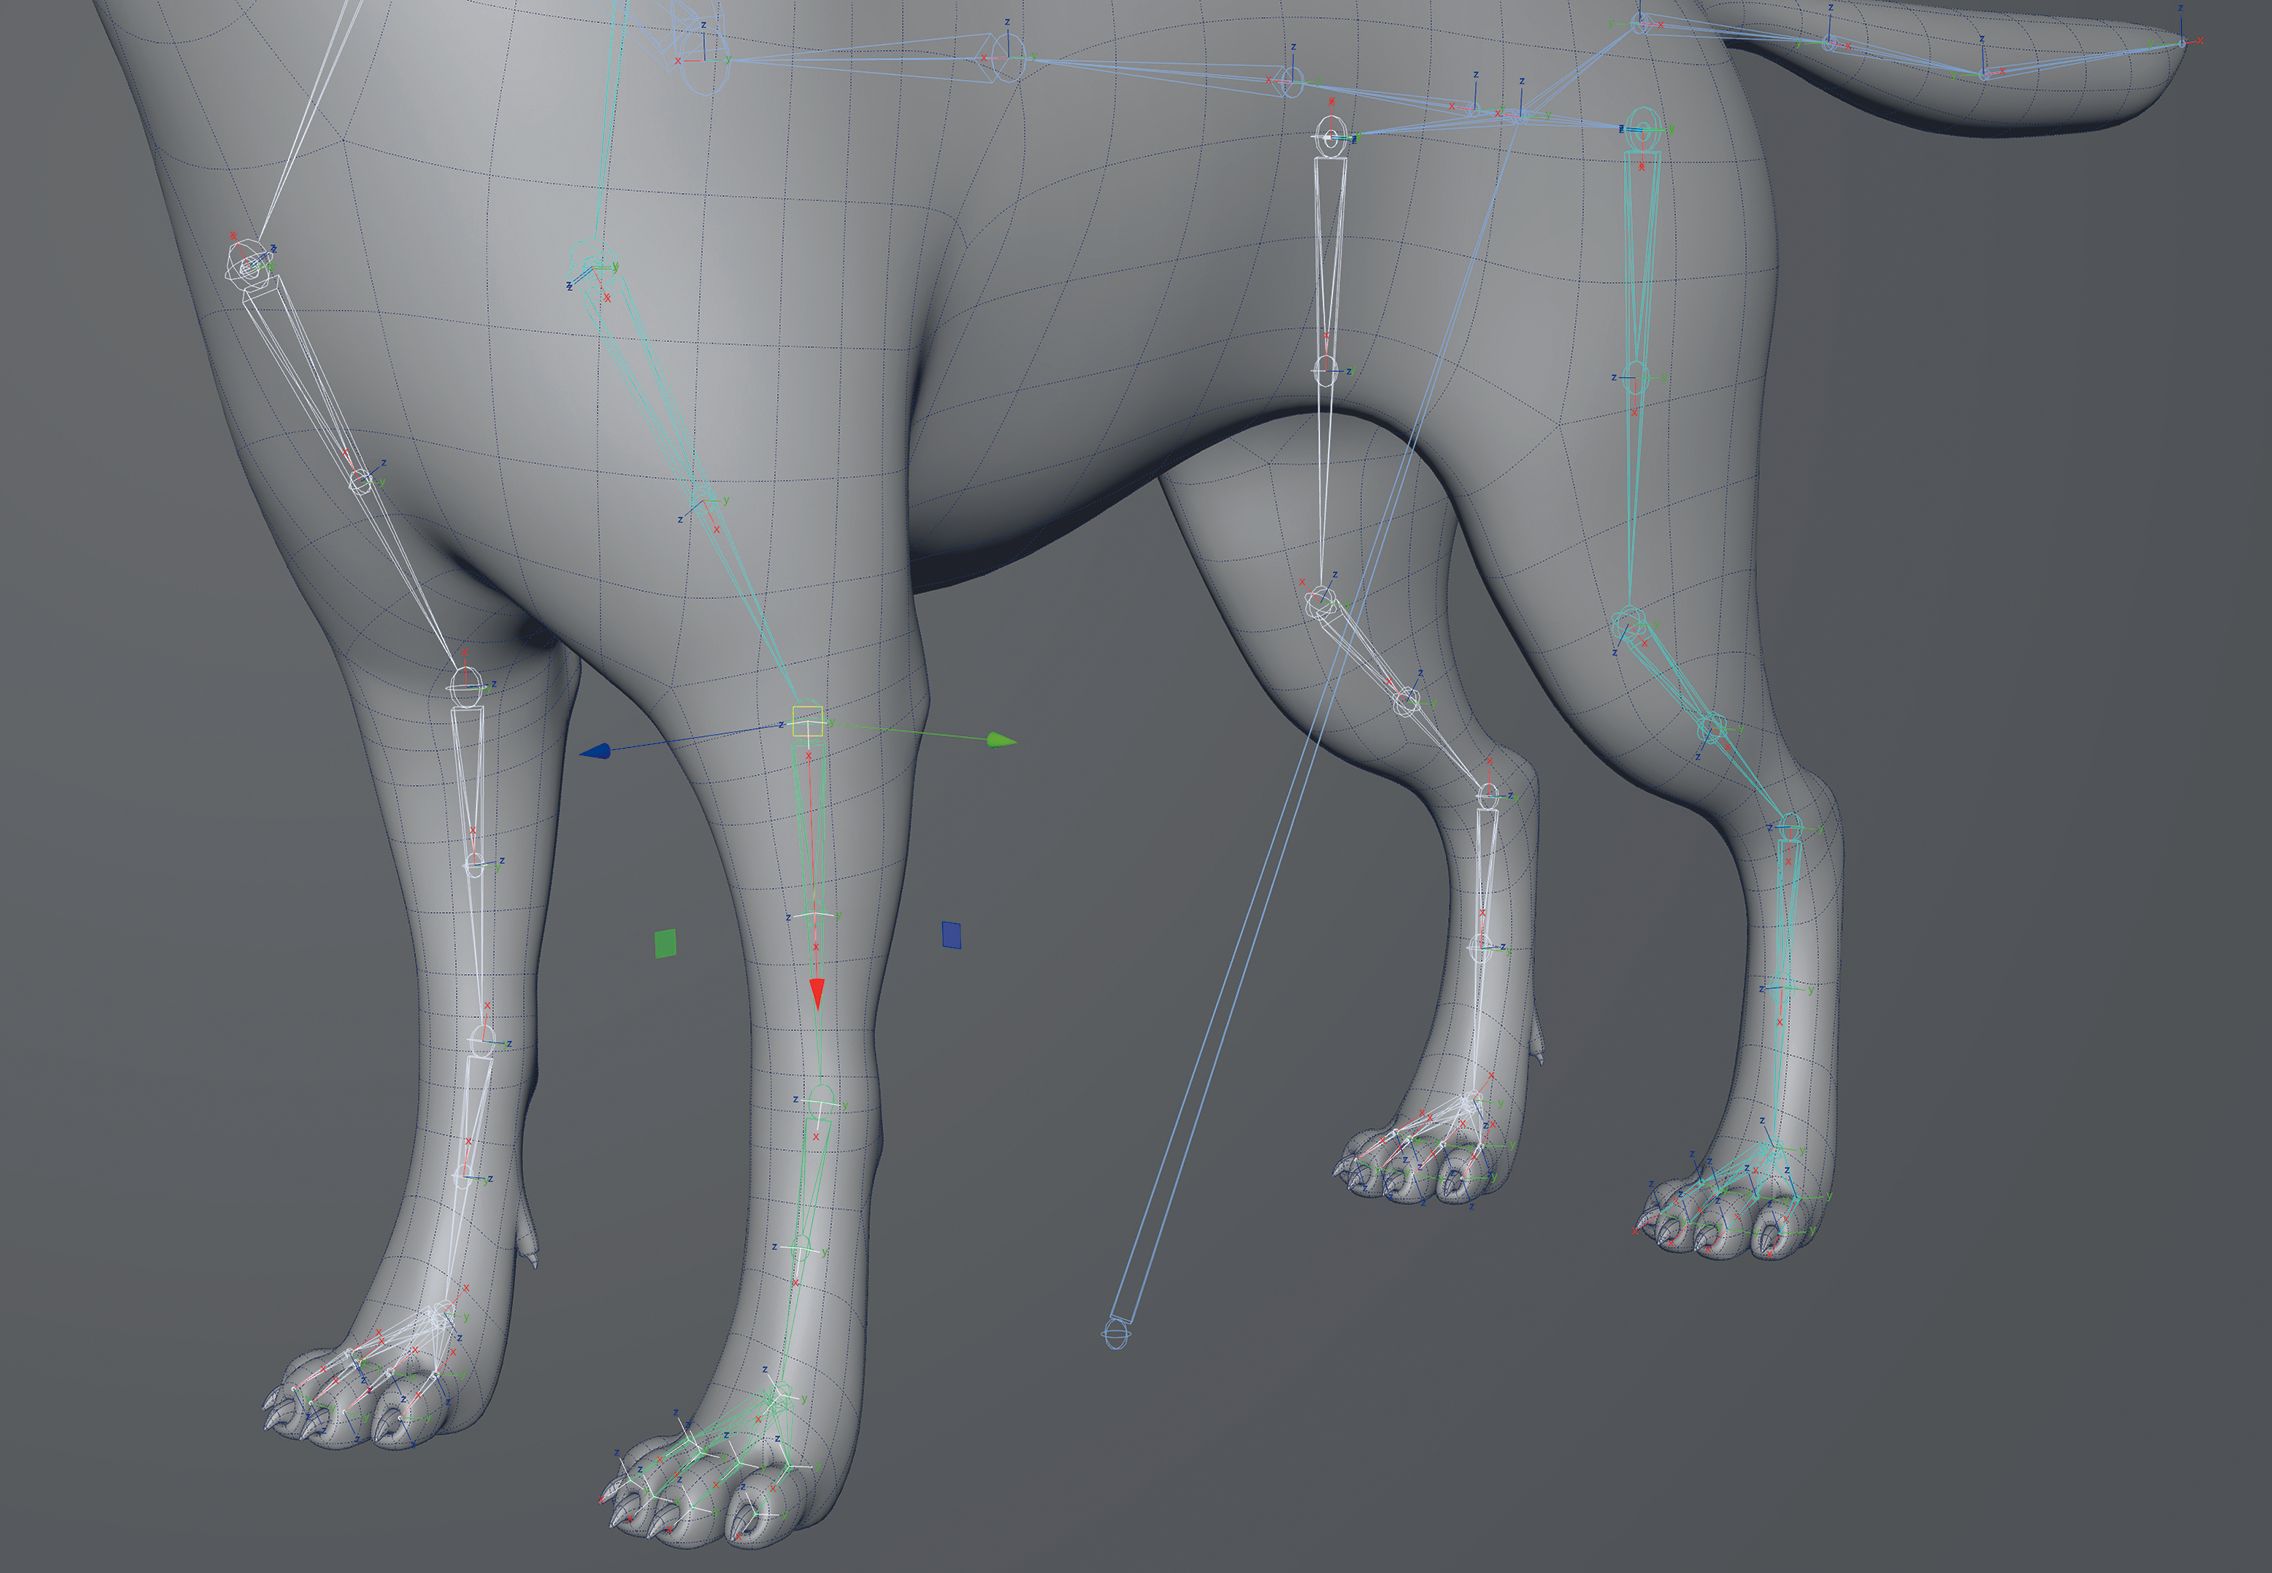
This setup is not arbitrary; it is designed to mimic the predictable nature of biological movement. Consider the human arm: when you rotate your upper arm, the rotation occurs around the humerus bone. By aligning the primary axis of a digital joint with the length of that bone, the software allows for a "twist" that feels natural and intuitive to an animator. When the axes are correctly aligned, an animator can manipulate a single rotation value to achieve a clean, longitudinal twist. If the axes are misaligned, that same movement might require adjustments across three different planes, leading to "counter-animation" and a significant loss of efficiency.
However, the "standard" setup is not always the "correct" setup for every project. The requirements for joint orientation often shift depending on the final destination of the asset. For example, different game engines—such as Unreal Engine, Unity, or proprietary studio tech—may have specific requirements for which axis points "up" or "forward." Furthermore, technical artists must often adjust orientations to mitigate the risk of gimbal lock, a state where two axes of rotation overlap, causing the loss of one degree of freedom and resulting in erratic, jerky motion.
01. Broken rotations
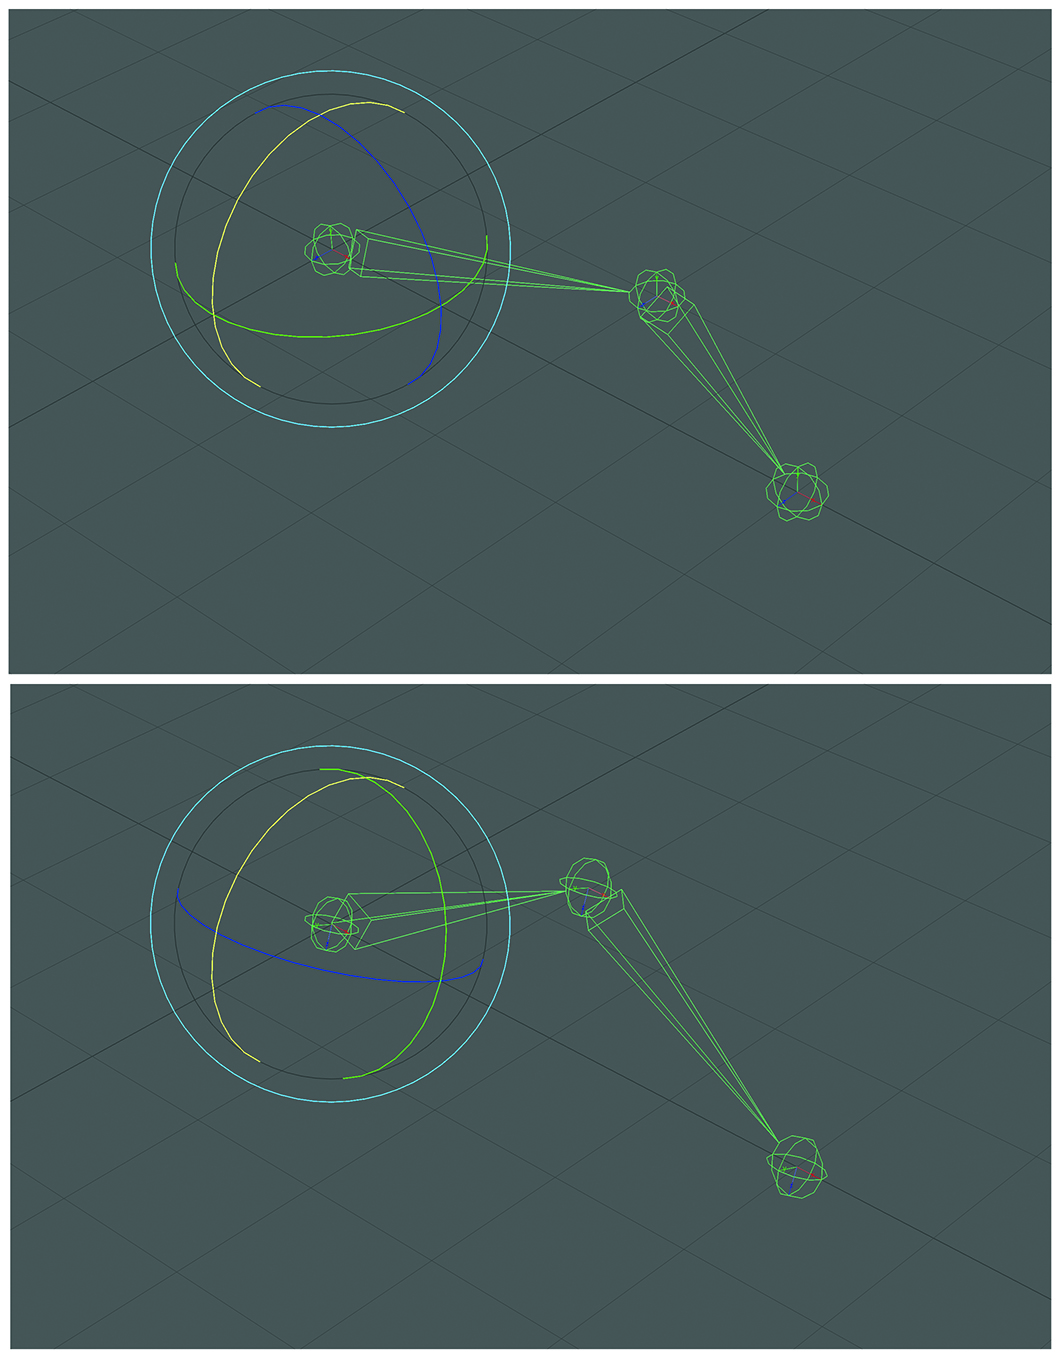
One of the most common issues encountered during the rigging process is the "reset" joint. This occurs when a joint’s orientation is accidentally or intentionally set to match the world coordinate system rather than the local direction of the joint chain. In this scenario, the joint’s X, Y, and Z axes point in the same direction as the global grid, regardless of the angle at which the joint was drawn.
In a simple three-joint arm setup—consisting of a shoulder, an elbow, and a wrist—this world-space alignment creates immediate functional problems. When an animator attempts to rotate the shoulder, the elbow joint may move away from its intended arc. Because the local axes do not follow the "bone" of the arm, the rotation becomes mathematically complex and visually jarring. The movement ceases to feel organic; instead of the arm pivoting naturally at the socket, it appears to slide or skew. For an animator, working with such a setup is akin to trying to drive a car where the steering wheel only moves in square increments. It is difficult to create the smooth, overlapping arcs that are the hallmark of high-quality animation when the underlying skeleton is fighting the intended direction of travel.
02. Set up your orientations
To rectify these issues, artists must look toward orientation tools provided within their 3D application. Correcting a rig involves more than just manual rotation; it requires a systematic re-alignment of the joint’s local coordinate system. Most professional software packages offer a dedicated "Orient Joint" tool that allows for precise control over how these axes behave.
There are generally three core parameters that an artist must define to fix a joint’s behavior. The first is the Primary Axis. This is the axis that will point directly down the joint toward the next child in the hierarchy. As previously noted, the X-axis is the traditional choice for this role in many pipelines, serving as the longitudinal "aim" axis.
The second parameter is the Secondary Axis. This axis defines the "up" or "side" direction of the joint, which is crucial for determining how the joint bends. For an elbow, the secondary axis should be aligned so that the "hinge" movement occurs cleanly on a single plane. Finally, artists must consider the Secondary Axis World Orientation. This setting tells the software which direction in the world space the secondary axis should try to align with (for instance, pointing toward the world’s Y-up direction). By balancing these three settings, a rigger can ensure that every joint in a character’s body behaves predictably, regardless of how complex the pose becomes.
03. Reset your orientations
The practical application of these settings can be seen when finalizing the three-joint arm. By selecting the joints and applying a consistent orientation logic—such as setting X as the Primary Axis and Y as the Secondary Axis—the rig undergoes a transformation. Once the tool is executed, the X-axis of the shoulder will point directly at the elbow, and the X-axis of the elbow will point directly at the wrist.
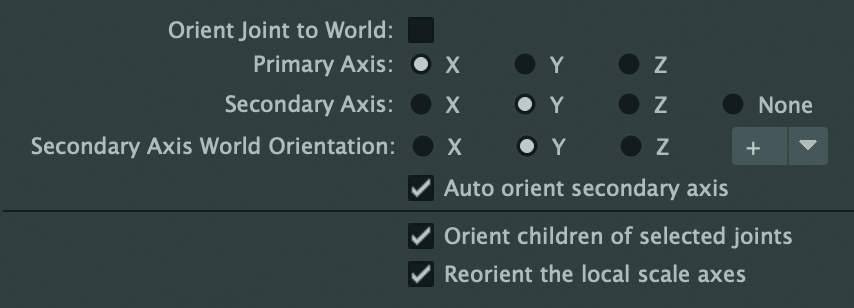
With this configuration, the Y-axis (the secondary axis) typically points "up" or outward from the bend of the arm. The result is immediate and transformative for the animation workflow. Now, when the shoulder is rotated, the elbow remains in its proper place, pivoting around a logical center. The forearm and wrist follow suit, allowing for clean twists and bends that require minimal effort from the animator. This predictability is the "secret sauce" of professional rigging; it allows the artist to focus on the performance and the silhouette of the character rather than fighting the limitations of the software.
The Role of the Technical Artist
The nuances of joint orientation highlight the vital role of the technical artist in the production cycle. Experts like Antony Ward, who has spent decades working with major game and VFX studios, emphasize that these "basics" are actually the most critical components of a successful project. Ward, an accomplished author and the owner of antcgi.com, has long advocated for a deep understanding of the technical manuals of software like Maya and Silo. His work underscores the fact that while 3D art is a creative endeavor, it is built on a framework of mathematical precision.
In a studio environment, the rig acts as the bridge between the modeler and the animator. If the rigger fails to account for joint orientation, the animator’s productivity drops, and the final quality of the movement suffers. Moreover, as assets move between different software packages—a process known as the "3D art workflow"—maintaining consistent orientation becomes even more complex. An asset that rotates perfectly in a modeling app may behave wildly when imported into a game engine if the axes aren’t properly mapped.
Ultimately, mastering these rotational axes is about providing freedom. By taking the time to configure the primary and secondary axes correctly, the rigger removes the technical barriers that stand in the way of creative expression. Whether it is reducing the frustrations of gimbal lock or ensuring that a character’s arm twists with the realism of a human limb, the careful management of joint orientation is what allows digital characters to truly come to life. As 3D technology continues to evolve, these fundamental principles of skeletal logic remain the bedrock of the industry, ensuring that the magic of animation remains seamless and convincing.